

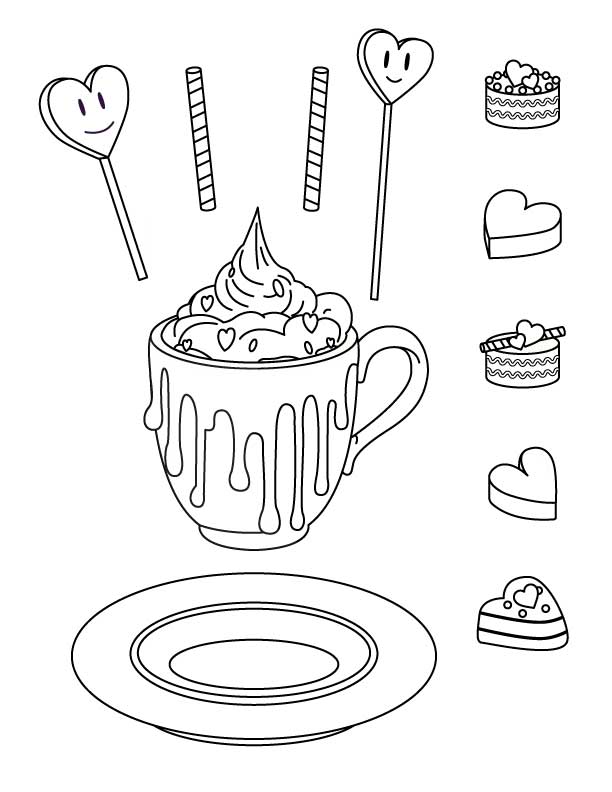
Cozy hot chocolate DIY paper art tutorial
How to Make a 3D Valentine Paper Art Card | Free Printable Template
Create a cozy Valentine’s Day 3D paper art project inspired by hot chocolate, quiet moments, and handmade creativity.
In this step-by-step tutorial, you’ll learn how to design, color, cut, and assemble a layered 3D paper art illustration that makes a beautiful Valentine’s decoration or thoughtful handmade gift.
This project is beginner-friendly and perfect for anyone who enjoys paper crafts, DIY Valentine’s projects, and relaxing creative time.
Cozy 3D paper art for Valentine's Day
This hot chocolate-themed 3D paper art was inspired by a rainy afternoon in my home studio in Spain. With colder temperatures and long rainy days, I wanted to create a paper craft that felt warm, comforting, and slow.
The result is a layered paper art illustration that celebrates:
Valentine’s Day
Cozy winter vibes
Handmade creativity
You can make this project:
Alone as a relaxing creative activity
Together with a loved one
Or as a DIY Valentine’s Day gift

What you'll learn in this 3D paper art tutorial
In the full tutorial, you’ll learn how to:
Create or trace paper art templates
Ink and color using alcohol markers
Cut paper elements cleanly and accurately
Assemble layered 3D paper art using foam squares
Add depth and dimension to paper illustrations
This tutorial is suitable for beginners and experienced paper crafters alike.
Step 1: Tracing & Drawing

Step 2: Inking & Coloring

Step 3: Cutting the paper elements

Step 4: Preparing the background

Step 5: Assembling the 3D paper art

Tools and materials for 3D paper art
Tools Needed
Pencil
Fine-liners
Eraser
Ruler
Scissors
Hobby knife
Tweezers
Glue
3D foam squares or foam board
Paper & Coloring Supplies
Thick multi-use paper
Test sheet for color swatches
Alcohol markers (I use Shuttle Art alcohol markers)
Using thicker paper is recommended when working with alcohol markers to prevent bleeding and warping.
Watch the full 3D paper art tutorial
You can watch the complete Valentine's Day 3D paper art video tutorial on my YouTube channel, where each step is shown clearly from start to finish.
Watch on YouTube the full 30-minute tutorial:
Free 3D paper art templates
To make this project accessible to everyone, I created two free downloadable templates: Ideal if drawing is not your strengthPerfect for saving timeSuitable for beginners
Template 1
Template 2
Step-by-step 3D paper craft overview
Step 1: Tracing and drawing
Trace the templates using a light board, iPad, or window. Transfer the drawings onto thick paper to prepare for coloring.
Step 2: Inking and coloring
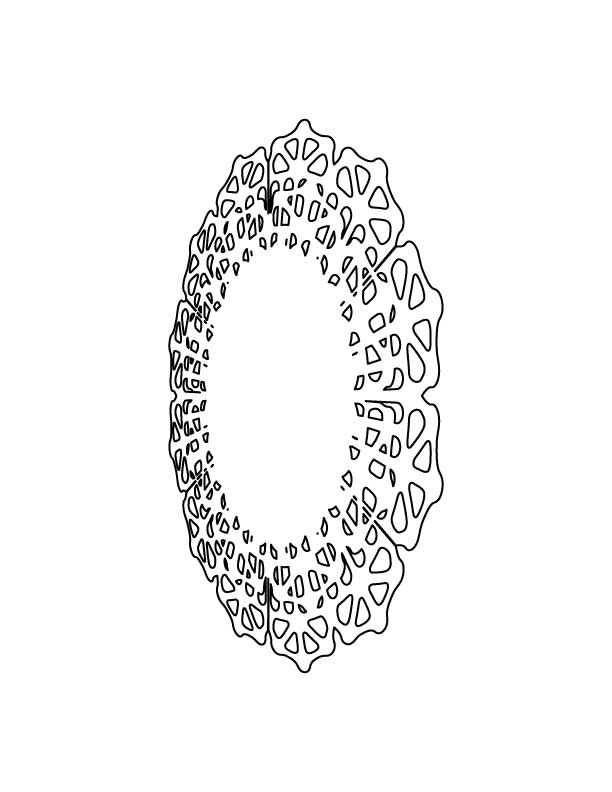
Ink all elements and color them using alcohol markers. Focus on soft shading and consistent colors to create a cozy look. For intricate details like the doily, shading instead of cutting small pieces keeps the process simple and enjoyable.
Step 3: Cutting the paper elements
Cut out all illustrations carefully, leaving a small white border around each piece. This enhances the handmade, playful look of the final artwork.
Step 4: Preparing the background
Cut the background paper to 21 × 21 cm. Draw decorative steam lines to reinforce the hot chocolate theme and add movement to the composition.
Step 5: Assembling the 3D paper art
Use foam squares to layer the elements:
Doily: 1 foam layer
Saucer: 1 foam layer
Cup: 3 foam layers
Bonbons and lollipops: varying layers for added depth
This layering technique creates the signature 3D effect in the finished paper art piece.
Finished Valentine's Day 3d paper art
The final artwork transforms a simple sketch into a cozy, dimensional 3D paper illustration.
It works beautifully as:
Valentine’s Day home décor
A handmade paper art gift
A relaxing creative project
Each layered element adds depth, texture, and warmth to the design.
If you enjoyed this tutorial:
Subscribe to my YouTube channel for more paper art tutorials and explore other DIY paper craft projects on my websiteHappy crafting,
Ingrid
Webstudio Paper Lab / Webstudio 2Amigos